Navigation Graph를 통해서 BottomNavigation과 Navigation Graph를 활용합니다. 이때, 단순하게 Navigation Graph를 사용하기도 하지만, 필요에 따라서 Navigaiton Graph가 중첩된 Nested Navigation Graph를 사용하기도 합니다.
가장 먼저 Navigation Graph를 구성합니다. 본 그래프의 형태는 include 태그를 활용하여 중첩 네비게이션으로 사용합니다. 각 그래프의 형태는 다음 사진과 같습니다.
<?xml version="1.0" encoding="utf-8"?>
<navigation xmlns:android="http://schemas.android.com/apk/res/android"
    xmlns:app="http://schemas.android.com/apk/res-auto"
    xmlns:tools="http://schemas.android.com/tools"
    android:id="@+id/bottom_nav_graph"
    app:startDestination="@id/fragment_refrigerator">

    <fragment
        android:id="@+id/fragment_refrigerator"
        android:name="com.angdroid.refrigerator_manament.presentation.home.fragment.RefrigeratorFragment"
        android:label="@string/my_refrigerator"
        tools:layout="@layout/fragment_refrigerator" />

    <include app:graph="@navigation/recipe_nav_graph"/>

</navigation>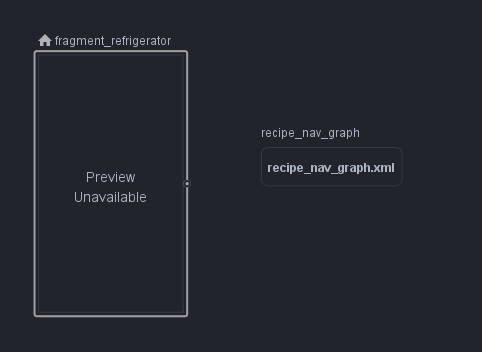
<?xml version="1.0" encoding="utf-8"?>
<navigation xmlns:android="http://schemas.android.com/apk/res/android"
    xmlns:app="http://schemas.android.com/apk/res-auto"
    android:id="@+id/recipe_nav_graph"
    app:startDestination="@id/fragment_recipe">

    <fragment
        android:id="@+id/fragment_recipe"
        android:name="com.angdroid.refrigerator_manament.presentation.home.fragment.RecipeFragment"
        android:label="@string/recipe" >
        <action
            android:id="@+id/action_recipeFragment_to_searchFragment"
            app:destination="@id/fragment_search" />
    </fragment>
    <fragment
        android:id="@+id/fragment_search"
        android:name="com.angdroid.refrigerator_manament.presentation.home.fragment.SearchFragment"
        android:label="@string/search_recipe" />
</navigation>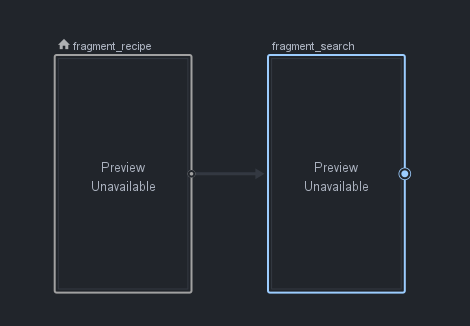
다음과 같이 recpie_nav_graph가 include 태그를 통해서 bottom_nav_graph에 중첩되어 있는 형태입니다.
이때, 주의해야 할 점은 bottomNavigationView에 쓰일 menu.xml Item에 한쪽에는 fragment 한쪽에는 navigation을 넣어줘야 정상적으로 작동합니다.
<?xml version="1.0" encoding="utf-8"?>
<menu xmlns:android="http://schemas.android.com/apk/res/android">
    <item
        android:id="@+id/fragment_refrigerator"
        android:iconTint="@color/gray2"
        android:icon="@drawable/ic_refrigerator"
        android:title="@string/refrigerator" />

    <item
        android:id="@+id/recipe_nav_graph"
        android:iconTint="@color/gray2"
        android:icon="@drawable/ic_recipe"
        android:title="@string/recipe" />

</menu>
다음과 같이 한쪽 item은 fragment의 id 한쪽 에는 recipe_nav_graph라는 navigation의 id가 들어 가 있습니다.
그후, XML상에서 menu를 적용시켜줍니다.
<com.google.android.material.bottomnavigation.BottomNavigationView
    android:id="@+id/bottom_nav_home"
    android:layout_width="match_parent"
    android:layout_height="@dimen/app_nav_space"
    app:itemIconTint="@drawable/selector_bottom_navigation"
    app:itemRippleColor="@color/primary_skyblue"
    app:itemTextColor="@drawable/selector_bottom_navigation"
    app:layout_constraintBottom_toBottomOf="parent"
    app:menu="@menu/bottom_nav_menu" />
마지막으로 다음과 같이 Host가 되는 Activity에서 navController를 얻은 후 BottomNavigationView에 controller를 달아 줍니다.
        val navHostFragment =
            supportFragmentManager.findFragmentById(R.id.nav_container) as NavHostFragment
        val navController = navHostFragment.navController
        val navGraph = navController.navInflater.inflate(R.navigation.bottom_nav_graph)
        navController.graph = navGraph

        binding.bottomNavHome.setupWithNavController(navController)
'안드로이드(Android)' 카테고리의 다른 글
| [Android] Fragment 생명주기 정리 (0) | 2022.10.14 |
|---|---|
| [Android] Constraint Chain 정리 (0) | 2022.10.05 |
| [Android]Activity 생명 주기에 관한 정리 (1) | 2022.10.04 |
| TextInputLayout에서 타이핑 한 문자, HintText가 보이지 않을 때 (0) | 2022.08.18 |